RoboHelp 2019 merged help: Adding new projects
RoboHelp has long been able to produce merged help, which combines any number of different RoboHelp projects into a single output.
I recently updated, upgraded, and merged an 18-project system for a client, and wrote a version of the following for when new projects need to be added.
If you have to upgrade and add new projects to a merged help system, I hope this checklist helps you make light work of the task.
Adding a new project to a merged help project
If creating a new project in RoboHelp 2019
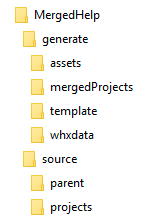
Create the project in the source > projects directory of your existing merged help project and match the structure of your existing projects.
The directories for your previously merged projects should already be in that directory.
If converting a legacy project to RoboHelp 2019
Update your legacy project to RoboHelp 2019 by opening it into RoboHelp 2019 Classic (old interface). The default RoboHelp 2019 installation should install both versions on your machine.
After processing, make note of the default topic used in your existing Single Source Layout (SSL)
Save and close the project.
Upgrading from XPJ to RHPJ
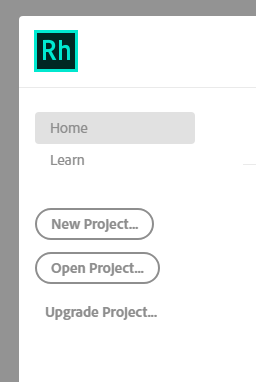
- In RoboHelp 2019 (new interface), use the Upgrade Project option available on the Starter Screen or under the File menu.
- Identify the project XPJ upgraded in the first step, and choose
source > projects as the destination for your upgraded project.
- Identify the project XPJ upgraded in the first step, and choose
- After upgrade, the project should open automatically. In the upgraded project do the following:
- In the Author workspace
- edit the TOC as needed (you may want to create one first-level topic with others nested underneath)
- In the Output workspace
- edit an existing Responsive HTML5 layout (or other output type, as needed) or create one from scratch.
- In the General category
- Set your TOC
- Set Output Path to generate > mergedProjects in your existing project structure
- In the Content category
- Ensure the proper Default Topic is specified (from Step 1)
- In the Layout category
- Set skin (A required step, but only used if the project is delivered independent of merged help. Otherwise parent skin will show.)
- Generate HTML5 and view to confirm success
- In parent project
- Edit TOC
- add merged help topic to existing TOC
- Generate HTML5 output
- Preview parent project to confirm the successful merge
- Edit TOC
- In the General category
- edit an existing Responsive HTML5 layout (or other output type, as needed) or create one from scratch.
Once you’ve got your structure updated, just republish the child project to see the changes within the merge project. The merge project only needs to be updated if you modify the number of projects or if you modify the look and feel of the project itself.

Join over 4,300 of your peers and get my latest content sent to you for free, along with some of my all-time favorites.