A quick guide to mobile publishing with FrameMaker 12
Do you need to get FrameMaker content to your users via phones and tablets? Are you well past the due date? Here are the steps you need to get the job done, including an introduction to custom skins and branding. For more content, view the one hour recorded Adobe webinar I gave in October, 2014. I’ve also included a video showing how to customize Responsive HTML5 layouts in the Customizing the HTML5 skin section, in case you’re interested…
Prepping your content
FrameMaker loves consistent use of style sheets and catalogs. If you or your users like to insert inline formatting and formatting overrides (especially paragraph and character format overrides), you should expect one of two things:
- You will spend some time regaining control of your documents by removing overrides and/or creating new styles to address formatting needs.
- Your online output will be formatted based on the formatting provided in FrameMaker. This is may or may not meet your organizational standards.
Once you’re happy with the formatting in your FrameMaker books and documents, you’re ready to get started.
Analyze baseline output
Access the Publish panel
FrameMaker 12 has a spiffy new Publish panel. Access it via File > Publish. There are 5 formats available, and this post will focus on the Responsive HTML5 layout.

Confirm selection of your FrameMaker content
If you want to convert a single FrameMaker (.fm) file, click on that file or tab to make it the active document. If you want to convert one or more files within a book, make the appropriate selection within the book file (.book).
Generate and view baseline output
Confirm that the Responsive HTML5 layout is selected, and click the Publish icon ![]() to generate an initial version of the output. You’ll use this initial output for three things:
to generate an initial version of the output. You’ll use this initial output for three things:
- to confirm that the publishing process is working
- to analyze for content mapping and processing
- to analyze for changes to the skin, or look, of the output
Once processing is complete, view the output and create two lists, one for content formatting (style mapping), and one for layout/branding changes (skin editing).
Style mapping
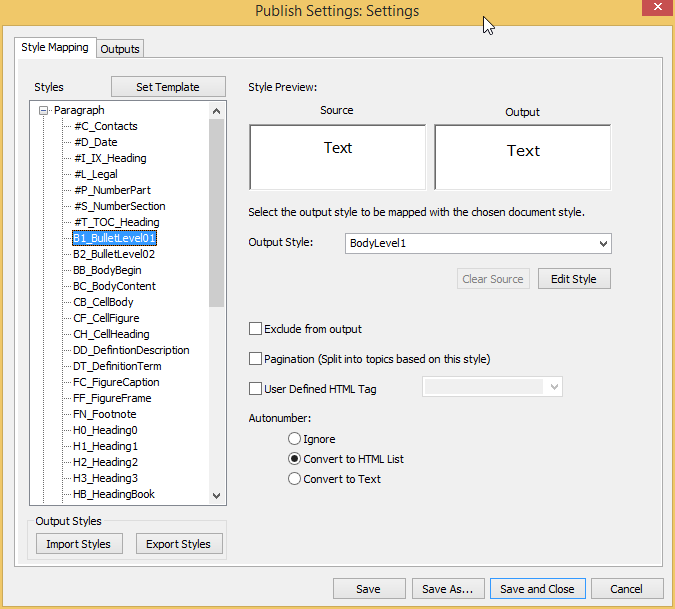
Select the Settings button ![]() and look at the Style Mapping tab. Your initial output likely used an Output Style of [Source], or FrameMaker’s source formatting to display all your online content.
and look at the Style Mapping tab. Your initial output likely used an Output Style of [Source], or FrameMaker’s source formatting to display all your online content.
Instead, you can map to specific CSS formats by changing the Output Style to something else.

Body content
In the screen capture here, the Output Style is BodyLevel1. The default CSS for conversion provides three different indent levels for you to use as needed.
Heading content
The first piece of content in each of your topics should be <h1>, or Heading 1 content. Map your highest level title to Heading 1.
For subsequent headings, consider whether the section is large enough to merit its own topic. If so, map the topic heading style to Heading 1 as well, and select the Pagination (Split into topics based on this style) option.
NOTE: Make sure your topics are separated by at least one or more non heading content paragraphs. Using this setting, if your Heading1 is immediately followed by a Heading2, for example, you will see the Heading1 result in a topic with title, but no content!
List content
Set up your first level (both bulleted and numbered) lists as shown below.I prefer to set up my lists using the Convert to HTML List option. I find this results in more stable code across different browsers and versions. Set the Output Style to BodyLevel1, and select the Convert to HTML List radio button. For nested lists, use the same setup, but choose the appropriate Output Style (BodyLevelX) to control indenting.
Advanced: Customizing the CSS
If you are comfortable modifying CSS formatting, and would like to customize your formatting a bit, check out the files in
C:\Program Files (x86)\Adobe\AdobeFrameMaker12\fminit\RH_DEFAULT_PROJECT
There you will find the RHStyleMapping.css, among other things.
Customizing the HTML5 skin
Both FrameMaker 12 and RoboHelp 11 have a fantastic editor for customizing responsive HTML5 skins. After selecting the Settings button ![]() , select the Output tab, and navigate to the Edit button
, select the Output tab, and navigate to the Edit button ![]() in the Layout section .
in the Layout section .
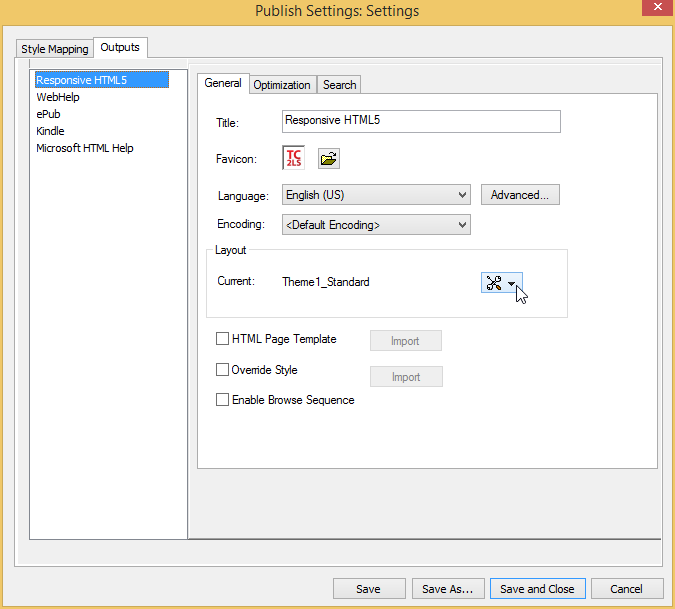
In the Edit window, you can customize just about every part of your HTML5 skin. Navigate through the Layout Components in the upper left corner to see 13 different sets of properties related to skin design. Each set includes a legend at the bottom of the screen, where you can select the property you want to customize, and automatically highlight it in the property panel.

About the author
Matt Sullivan is the founder of Tech Comm Tools, and is an Adobe Certified Instructor for each of the applications in the Adobe Technical Communication Suite. He teaches live online and in-person Adobe software classes for many different groups.
Matt also teaches classes on Tech Comm Video and classes on Social Branding for the Society for Technical Communication and other groups.
Contact him at www.mattrsullivan.com for more information.
To view any of the free recordings of his Adobe-sponsored webinars see http://bit.ly/tcs-webinars and search (Command/Control+F) for Matt Sullivan.

Join over 4,300 of your peers and get my latest content sent to you for free, along with some of my all-time favorites.