
By request: FrameMaker Glossary and GlossaryTerm Markers
Background info
This post is a bit on the geeky side, so you may need additional FrameMaker skills (working with markers, books, generated files, reference pages, and others) to get this to work. If you need more info, consider the Adobe FrameMaker forums (forums.adobe.com), my FrameMaker book (EPUB available now, print available on Amazon after August 2015), or contact me about live FrameMaker courses or online courseware. This one was a doozy to write, and required some creative steps, so I hope it helps you!
If you’re in a hurry, and don’t like a good story you can (along with chilling out and switching to decaf) scroll down to the numbered steps below for the details related to glossary marker entries.
Recently I received a request for an additional section in my FrameMaker reference book. The request came from my friend, Dr. Ugur Akinci, and mirrors my own thoughts on FrameMaker’s glossary marker process. Here are excerpts from an email, shared with permission from the good doctor:
“…you might want to consider to include a section on how to construct a Glossary file in FM since there does not seem to be any reliable step-by-step instructions on the Internet about using the “Glossary” and “Glossary Term” markers and FM’s own help file falls short of the mark.”
In another email he went on to say:
“I spent a whole day to generate a true FM 12 Glossary and could not get it right. Consulted FM’s own help file and tried to follow it down to the letter but it didn’t work since no step-by-step from start-to-finish illustration was provided. I also of course searched the Internet (including YouTube) but other than similar writers complaining about the same thing I could not come across anything useful… I even consulted the mighty “FM11 Bible” by Sullivan & O’Keefe but still no dice 🙂 Thanks a lot for all your help. Ugur”
Now I wish I could say, “Hey, it’s easy, just do this…” but the truth is these markers always trip me up, and I’m always headed back to the aforementioned Adobe help system to (re)decipher the instructions!
What Dr. Akinci didn’t yet know is that I’d completed the update to my FrameMaker book last week, but have only released the EPUB) to a few folks; I’ve not yet gotten the book to the publisher for sale on Amazon. Therein lies the trouble with writing a reference book… there’s always more detail you can add!
Since I didn’t actually get the book released last week (or this week!) I still have the material close enough at hand to make a addition in the form of a chapter on glossaries, per Dr. Akinci’s request.
Want the FrameMaker 2015 EPUB for just $25 USD?
Fill out this form and I’ll get you taken care of.
[contact-form to=’matt@mattrsullivan.com’ subject=’FrameMaker Glossaries Post’][contact-field label=’Name’ type=’name’ required=’1’/][contact-field label=’Email’ type=’email’ required=’1’/][contact-field label=’Comment’ type=’textarea’ required=’1’/][/contact-form]
So why worry about glossary markers?
In my experience, not many FrameMaker authors care whether a glossary is manually curated or is a file generated automatically from markers.
In fact, the difference is small enough that I copped out of writing up automatically generated glossaries for the FrameMaker 11 book. It’s dry, dusty material, and honestly, I’d never been pressed by a client or student to straighten it out in a live print or PDF project.
However, FrameMaker 2015 now does digital publishing, in addition to the long standing ability to link FrameMaker content to RoboHelp projects. Both these methods of digital publishing can use properly formatted glossary markers to create interactive glossaries in HTML5, WebHelp, and mobile apps for iOS and Android devices. (and other formats may be on the way…)
Marking the content isn’t very difficult, but the markers need to match up in an specific way for the glossary to work properly in both FrameMaker generated documents and in digital output. The confounding part of the process is the labeling of the markers themselves, and the descriptions provided in the FrameMaker online help system.
And did I mention that if you want both print and digital glossaries, there’s a marker type you’ll want to define for yourself? Put these concepts to use in your own project, and you can truly count yourself among the FrameMaker elite! (or the FrameMaker geeky, whichever seems to fit!)
 Marking a FrameMaker glossary definition for digital publishing
 Marking a FrameMaker glossary definition for digital publishing
 If needed, create a single paragraph which contains only the definition of your glossary term.
- Place your cursor in the paragraph which is your term definition.
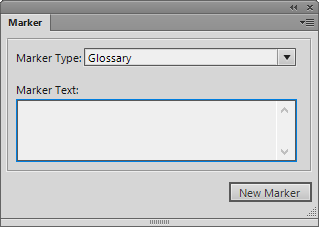
For consistency and findability, I use the beginning of the paragraph for the digital glossary definition. - Navigate to the Marker pod, and select the Glossary marker type from the dropdown list.
- For the marker text, type in the name of your glossary term. You can use an actual term consisting of multiple words here…you’re not limited to a single word.
- Select the New Marker button to create your marker.
 If needed, create a single paragraph which contains only the definition of your glossary term.
Easy, right? The biggest problem (for me) is that I desperately want to type the glossary definition into the marker text. Hint: That causes problems! Another issue: The FrameMaker help system has this process written somewhat differently, and files it under Create the glossary term definition, which hurts my brain, as it contains both term and definition in the heading.
Marking a FrameMaker glossary definition for print or PDF
- Create a new marker type called GlossaryPrintDefinition.
I’ve requested this be added to FrameMaker’s default marker list, so check to make sure it’s not already in your document. - Place your cursor in the definition paragraph.
- Navigate to the Marker pod.
- In the marker text area, type in the term you want included in your print glossary. After the term, insert a semicolon and then type out the definition. The semicolon creates a second level index entry we’ll use later in the Reference page section.
- Insert the marker in the paragraph containing your glossary definition. For consistency and findability, I put these markers at the end of the paragraph.
 Create a new marker type called GlossaryPrintDefinition.
Marking FrameMaker glossary term for digital publishing
Marking glossary terms is infinitely easier than what’s required for the glossary definition(s). To mark glossary terms, do the following:
- Locate an instance of your glossary term in your text, and place your cursor at the beginning of the term.
- Navigate to the Marker pod, change the marker type to GlossaryTerm.
- Type the glossary term into the marker text.NOTE: If you highlighted the term in Step 1, the text may already be entered in the marker text area. No problem, just ensure the marker type is set to GlossaryTerm and select New Marker.
- Generate your glossary for the document or for the book, and modify the formatting and reference pages as needed. See below for tips on modifying the reference page.
IMPORTANT: While not technically necessary to enter the term into the GlossaryTerm marker (FrameMaker will use the word into which the marker is placed), for everyone’s sanity, just use the glossary term as the marker text for both the glossary term and the glossary definition markers.
- For digital publishing output, use the Find/Change pod to search for instances of the glossary term.
- Copy the glossary term and its marker to the clipboard.
- Use Change by: Pasting to replace all instances of the term with the term+marker that you copied to clipboard in Step 6.
 Locate an instance of your glossary term in your text, and place your cursor at the beginning of the term.
NOTE: Steps 5-7 are optional, but ensure that all instances of your term will link to the glossary definition in the digital output.
Create the generated glossary for print or PDF
While you can set up a glossary for an individual file, I find it more common to create a glossary for a book, so the following describes that scenario:
- With the book file active, add an Index of Markers.
- Include the GlossaryPrintDefinition marker in this generated file.
The Glossary and GlossaryTerm markers are used for creating digital output, and are not needed here. If you followed the model above, the GlossaryPrintDefinition marker already contains both the first second level index entries you need for your print glossary.
Modifying the reference pages
Use the following list as a guideline to setting up your print glossary FrameMaker file. If you need additional information on generated file setup or reference and master pages, consider getting my FrameMaker book, or attending my FrameMaker class or online course.
- Remove the <$pagenum> building blocks from the Level1IOM and Level2IOM entries, leaving only an empty paragraph mark (a pilcrow, or ¶).
- Remove the leading space from the IOM entry paragraph.
- If you don’t like the classic style of the first and second level index entries, try setting the Level1IOM paragraph to Run-In Head, setting default punctuation as needed. This gives you a more tabular look to the entries.
How did you do?! Let me know if you found this helpful, and if you have other FrameMaker oddities I can help with.

Join over 4,300 of your peers and get my latest content sent to you for free, along with some of my all-time favorites.